How to Make Light-Up Halloween Witches that evoke that magical Pottery Barn charm are easier than you think! Are you tired of your Halloween decor feeling a bit… flat? Maybe your entryway lacks that spooky, yet sophisticated, wow factor, leaving you with a less-than-enchanting vibe as guests arrive? Well, get ready to banish that blandness! Imagine greeting trick-or-treaters with a trio of enchanting, softly glowing witches, their flowing robes illuminated from within, casting a bewitching spell on your porch or living room. This delightful DIY project can be yours for around $30-$50 and takes just a weekend to complete. In this guide, I’ll walk you through everything you need to know to create these captivating figures, transforming your home into a truly magical Halloween destination.
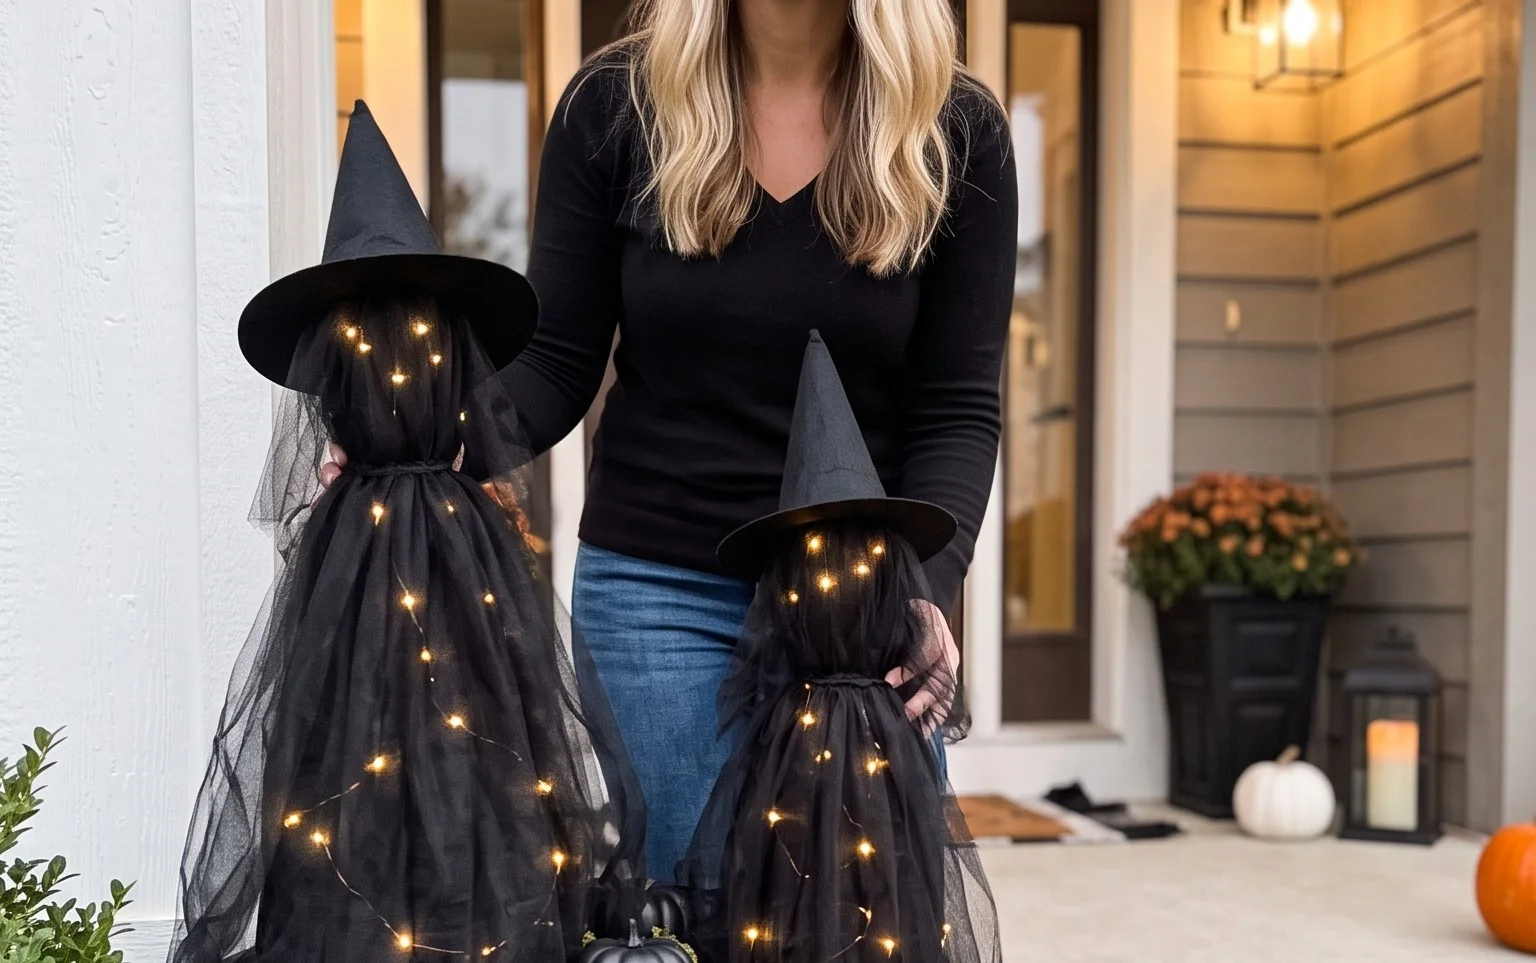
Conjure Enchantment: DIY Pottery Barn-Inspired Light-Up Halloween Witches
There’s a certain magic in the air as Halloween approaches, and nothing says spooky sophistication quite like a touch of dimly lit enchantment. Pottery Barn consistently delivers that perfect blend of cozy and eerie with their seasonal decor, and their light-up witch figures are a prime example. While their price tags can be a little daunting, the good news is that creating your own stunning, Pottery Barn-inspired light-up witches is surprisingly achievable and incredibly rewarding. Get ready to add a touch of spectral glow to your home this Halloween!
Gathering Your Coven: What You’ll Need and Rough Costs
Before we dive into the crafting, let’s assemble our ghostly gathering. Think of this as your witch’s brew ingredients list.
Here’s what you’ll need:
- Tall, Cylindrical Objects (x3 or more): These will form the base of your witches. Think empty paper towel rolls (you might need to tape a few together for height), cardboard tubes from gift wrap, or even sturdy plastic bottles like 2-liter soda bottles (cleaned and dried). For a Pottery Barn look, aim for a height of at least 18-24 inches.
- Rough Cost: Free to $5 (if you buy specific craft tubes).
- Fabric for Robes: This is where the magic happens visually. Look for textured fabrics in deep, moody colors like black, charcoal grey, deep plum, or even a rich forest green. Burlap, felt, or even old velvet curtains can work beautifully. You’ll need enough to wrap around your cylinders, with plenty to drape and create layers. For three witches, estimate about 1.5 to 2 yards of fabric in total.
- Rough Cost: $10 – $30, depending on fabric choice and sales.
- Craft Paint: Black is essential, but you might want a dark grey or even a deep brown for variation. Acrylic craft paints are perfect.
- Rough Cost: $5 – $10.
- Mod Podge or Craft Glue: This will be your adhesive for attaching fabric and embellishments.
- Rough Cost: $5 – $8.
- String Lights: Battery-operated fairy lights or micro LED string lights are ideal. Choose warm white or a flickering amber for a vintage glow. You’ll need one strand per witch, so about 3-6 strands total, depending on the length of your chosen lights (aim for strands that are 6-10 feet long).
- Rough Cost: $15 – $30.
- Optional Embellishments: Think faux cobwebs, small faux spiders, dried twigs, raffia, jute twine, small faux skulls, or even lace scraps for a more ethereal look.
- Rough Cost: $5 – $15.
- Hot Glue Gun and Glue Sticks: Essential for attaching heavier embellishments securely.
- Rough Cost: $10 – $15 (if you don’t already own one).
- Scissors, Craft Knife (optional), Paintbrush.
- Rough Cost: Minimal if you already have them.
So, for a coven of three, you’re looking at a rough investment of $50 – $100, a significant saving compared to purchasing similar store-bought figures.
Measure Twice, Witch Thrice: Planning Your Enchantress
Before you unleash your inner crafter, take a moment to plan. This is the crucial step that separates a charming witch from a wobbly one.
First, consider your space:
- Height: How tall do you want your witches to be? Measure the intended location. If they’re going on a mantelpiece, you’ll want them shorter than if they’re gracing your porch steps.
- Width: How much surface area do you have? This will influence how wide you want the fabric to drape.
- Number of Witches: Do you want a solitary sorceress or a coven of three or more?
Next, sketch out your vision:
- Silhouette: Think about the classic witch shape. You want a tall, slender body with flowing robes. Consider how you want the fabric to hang – will it be straight and severe, or more voluminous and gathered?
- Color Palette: While black is a classic, consider how your chosen fabrics will look together. Mixing textures within your chosen palette can add depth and sophistication, just like Pottery Barn does. A matte black felt paired with a slightly shimmery charcoal grey can be very effective.
- Lighting Placement: Where will the lights go? Inside the cylinder? Draped around the fabric? Peeking out from the hem?
This planning stage is your secret spell to success. It ensures your witches will fit your space and achieve the desired aesthetic.
The Spellbinding Process: A Step-by-Step Guide
Now, let’s get our hands witchy!
- Prepare Your Witch’s Body: Take your chosen cylindrical object(s). If you’re using paper towel rolls or gift wrap tubes, tape them together securely to achieve your desired height. If using plastic bottles, ensure they are clean and dry. For stability, you can fill the bottom of plastic bottles with sand or pebbles, but ensure the opening is still large enough to feed your lights through later.
- Paint the Base: Paint your cylindrical object(s) with your base color. Black or a very dark grey is ideal. Apply 2-3 coats for good coverage, allowing each coat to dry completely. This painted base will be the “neck” and upper torso of your witch, peeking out from the fabric.
- Cut Your Robes: Measure your cylindrical body. You want your fabric to wrap around it with plenty of excess for draping and volume. For a typical 2-liter bottle or combined cardboard tubes of about 20 inches tall, cut a rectangle of fabric roughly 15 inches wide and 30 inches long. The width will determine how much the fabric drapes around the base, and the length will be the height of your witch. It’s better to have too much fabric than too little!
- Attach the Fabric: Apply Mod Podge or craft glue generously to the painted cylindrical body, starting from the top. Carefully wrap the fabric around the cylinder, smoothing out any wrinkles as you go. Let the fabric hang down freely. You’ll want the fabric to extend about 1-2 inches below the base of your cylinder to create a finished hem.
- Shape the Robes: This is where your witch comes to life! Gather the fabric at the top, just below the painted portion, to create the illusion of a neck. You can tie it with twine or a thin strip of fabric, or simply use a bit of hot glue to secure it. Let the fabric cascade down. You can pleat, fold, or twist it to create interesting textures and volume. Think about how a real robe would hang.
- Add Dimension and Texture (Optional): Now for the fun embellishments! Use your hot glue gun to attach faux cobwebs, small spiders, or twigs to the fabric. You can also glue on raffia or jute twine around the gathered “neck” for a rustic look. For a touch of gothic elegance, consider adding lace trim.
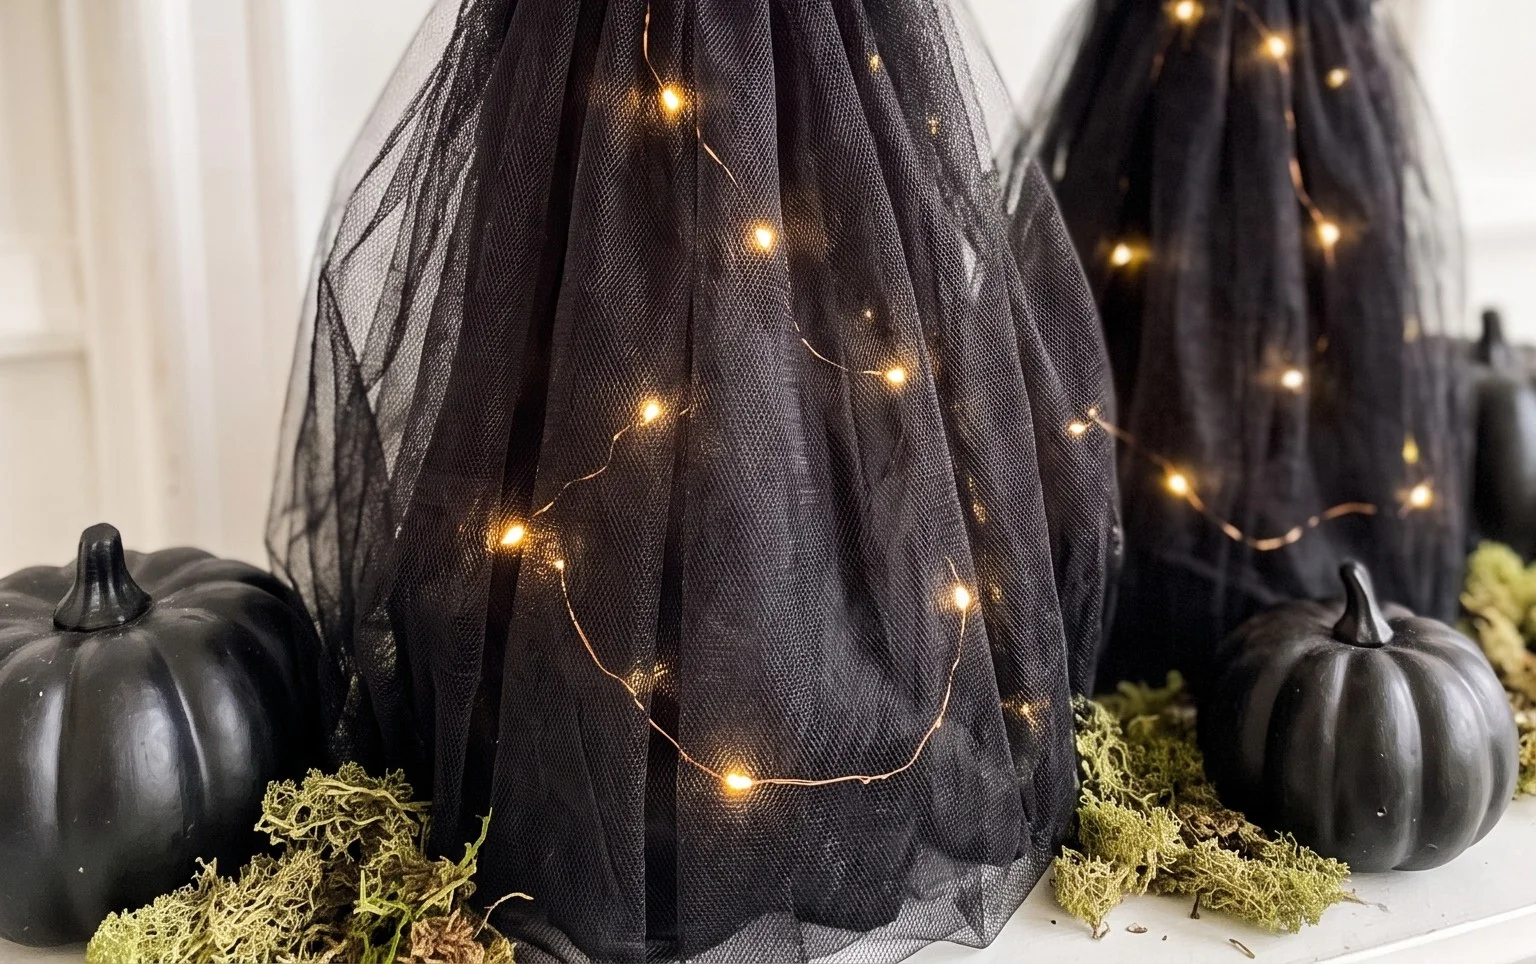
- Install the Lights: Gently feed your battery-operated string lights into the top opening of your witch’s body. You can let the lights cascade down inside the fabric, creating an internal glow, or carefully drape sections of the lights on the outside of the fabric, tucking them into folds. Ensure the battery pack is accessible for on/off switching and battery changes – you can often tuck it discreetly within the folds of the fabric at the base or near the top.
- Final Touches: Stand back and admire your creation! Adjust the fabric, add any last-minute embellishments, and ensure the lights are positioned to your liking.
Adapting for Smaller Spaces and Rentals
The beauty of this DIY is its adaptability.
- Small Space Savvy: For apartments or smaller homes, opt for shorter cylinders. Empty Pringles cans or even sturdy cardboard boxes painted black can serve as bases. Focus on elegant fabric draping and a single, well-placed string of lights for maximum impact without overwhelming the space. You can also skip the multiple witches and create one striking statement piece.
- Rental Reality: The best part? No drilling required! All the adhesive methods (Mod Podge, craft glue, hot glue) are non-damaging. Ensure you use temporary adhesive if you’re concerned about residue on surfaces. When it’s time to pack up, the fabric can be removed, and your base objects can be reused or recycled.
Styling Notes: Where Enchantment Meets Elegance
Once your witches are complete, it’s time to let them shine.
- Color Coordination: Stick to your chosen moody palette. If you have a black witch, pair it with deep purples, greys, or muted oranges for accents. Don’t be afraid to mix textures: a burlap-wrapped witch could sit alongside one dressed in velvet.
- Placement is Key: Group your witches together on a mantelpiece, console table, or at the entrance to a room for a dramatic effect. Vary their heights slightly by placing them on books or small risers to create visual interest.
- The Power of Light: The warm glow of the fairy lights is crucial. Ensure they are positioned to create a subtle, enchanting illumination rather than a harsh glare. Let the light peek through the fabric folds for a mystical aura.
- Complementary Decor: Think beyond the witches. Incorporate other textured elements like faux spiderwebs, dried leaves, small pumpkins or gourds in muted tones, and perhaps a black raven or two to complete the atmospheric scene.
Keeping the Magic Alive: Tidiness Tips
Your witches are built to last, but keeping them looking their best is easy.
- Dusting Delight: A soft feather duster or a microfiber cloth is all you need for regular dusting. For more stubborn dust on fabric, a handheld vacuum cleaner with a brush attachment on its lowest setting can be used gently.
- Light Check: Batteries will eventually need replacing. Keep a small stash of the correct battery type handy. Ensure the battery pack is accessible for this task.
- Fabric Care: If any part of the fabric becomes creased or misshapen, a gentle hand-smoothing or a very low-heat iron on the reverse side (test in an inconspicuous area first!) can often restore its shape. Avoid washing the fabric if it’s glued directly to the base.
The Pitfalls of the Potion: Common Mistakes to Avoid
Even the most well-intentioned crafter can stumble. Here are some common mistakes that can make your light-up witches fail:
- Too Much Glue, Not Enough Fabric: Over-gluing can lead to stiff, unnatural-looking robes. Use enough glue to secure, but allow the fabric to drape and flow freely. Conversely, not using enough glue can result in fabric sagging.
- Ignoring Stability: If your base isn’t stable, your witch will be wobbly. Ensure your cylindrical objects are securely joined and, if using plastic bottles, consider adding weight to the base for better balance.
- Poor Light Placement: Cramming all the lights into one spot will create a bright, unappealing glow. Distribute them strategically within the fabric for a more diffused and enchanting effect. Also, ensure the battery pack is accessible!
- Over-Embellishment: While embellishments are fun, too many can make your witch look cluttered and less sophisticated, losing that Pottery Barn-inspired elegance. Less is often more.
- Forgetting the “Witch” Shape: Without proper gathering or draping at the top, your witch can look like a fabric-covered tube. Spend time shaping the fabric to create that iconic witch silhouette.
With a little planning, patience, and these step-by-step instructions, you can create your very own coven of stunning, light-up Halloween witches that will cast a spell of spooky charm over your home all season long. Happy crafting!
Conclusion
Bringing a touch of playful magic into your home with these Pottery Barn-inspired light-up Halloween witches isn’t just for the spooky season. Imagine the delight on your children’s faces, or simply the cozy, inviting glow you’ll experience daily as you pass by. The impact of these charming decorations, even when unlit, is a subtle but constant reminder of festive joy.
Ready to start today? Your smallest first step could be gathering a few empty jars or cardboard tubes – the foundation for your very own witchy creations. For a different vibe, consider using small pumpkins for a more rustic feel, or opt for battery-operated string lights in mason jars for a budget-friendly alternative in the living room.
We hope this guide has inspired you to embrace the spirit of Halloween decor! Keep exploring for more enchanting ideas to transform your space.